

Application Fields
Create and manage fields that belong to applications in a selected pipeline.
Application fields store information about one application inside a selected pipeline. They are different from student fields because the value belongs to the application, not the student profile.
Use application fields when a student may have different values for different applications.
Pipeline Selection
Application fields are managed per pipeline. In the local example, the first pipeline is Student Visa Processing.
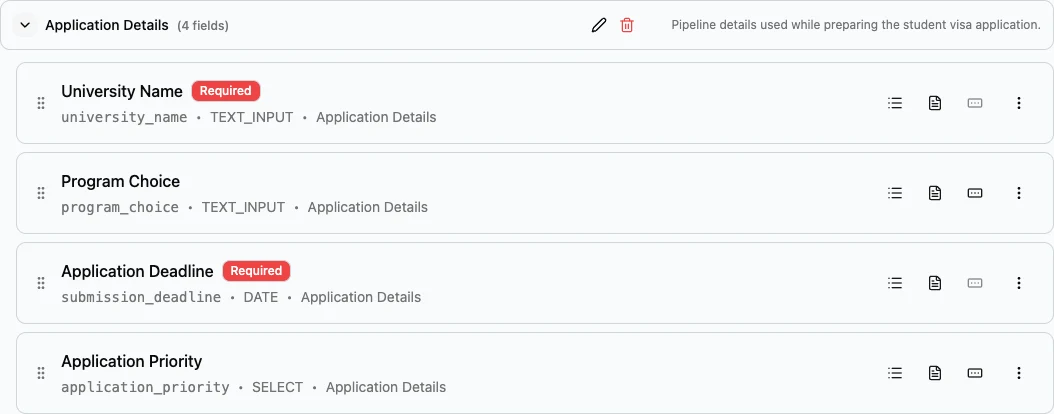
When Student Visa Processing is selected, the page shows the application field groups and fields for that pipeline. In the example below, the Application Details group includes:
| Field | Type | Why it belongs here |
|---|---|---|
| University Name | Text Input | One student can apply to different universities. |
| Program Choice | Text Input | Each application can be for a different program or course. |
| Application Deadline | Date | Each application can have its own deadline. |
| Application Priority | Dropdown | The team can mark which applications need faster handling. |
Student Fields Versus Application Fields
Use this decision table before adding a field.
| Question | If yes |
|---|---|
| Does the value describe the student regardless of application? | Use a student field. |
| Can the value be different for each application? | Use an application field. |
| Is the value only relevant to one pipeline? | Use an application field in that pipeline. |
| Will the value be used before any application is created? | Use a student field. |
For Student Visa Processing, fields such as University Name, Program, Intake, Application Deadline, Offer Status, Visa Submission Date, Visa Outcome, and Pre Departure Notes usually belong to the application.
Create An Application Field
- Open Settings.
- Select Field Management.
- Open Application Fields.
- Choose the pipeline, such as Student Visa Processing.
- Select Add Field.
- Enter the Display Label.
- Review the Field Name.
- Choose the Field Type.
- Choose the Field Group.
- Add Placeholder Text when the empty field needs a hint.
- Add Help Text when users need a short instruction.
- Turn on Required Field only when every application in that pipeline must have the value.
- Create the field.
The application field dialog is simpler than the student field wizard. It shows the main settings in one dialog and adds extra settings only when the selected field type needs them.
Type Specific Settings
Some application field types reveal extra settings:
| Field type | Extra settings |
|---|---|
| Dropdown, Multi Select, Radio Buttons | Manual options or dataset based options. |
| File Upload, Image Upload | Document Type, which controls accepted formats and file size. |
| Other basic types | Placeholder Text and Help Text. |
Use field categories and types to choose the right type. Use field configuration to understand the available settings.
Display In Application Views
Creating an application field stores the data. It does not guarantee the field is visible in every view.
After creating application fields, open display configuration and select the same pipeline. Application views can show both student profile fields and application fields, so users can see the full context while working through the pipeline.